Sunday, December 2, 2012

Brine-Cured Pork Chops with Balsamic Glaze

Thanks to a couple of great cookbooks, I've discovered a whole new way to prepare pork chops - brining! Now, I'm sure this is old news to most cooks out there; I may be late to the game, but at least I showed up! You basically give the chops a salt and herb bath for a good half a day, or at least a few hours, and it tenderizes the pork and keeps it nice and juicy when you cook it. It works great for pan-cooking the chops, or grilling.

This particular recipe features shallots sauteed in balsamic vinegar - it's a pungent combination, and delicious with the pork. The recipe is adapted from this fantastic cookbook my parents got me last Christmas, that I'm practically reading like a novel - Williams Sonoma's "San Francisco: Authentic Recipes Celebrating the Foods of the World". It gives a great overview of food in the Bay Area, then recipes! Not 100% sure what makes this a Bay Area recipe, but hey! It's delicious, so I'll buy it.

BRINE: from Fred Thompson's "Grill Master: The Ultimate Arsenal of Back-to-Basics Recipes for the Grill":
1/4 cup cider vinegar
1/4 cup firmly packed brown sugar
1 tsp thyme
1/8 tsp red pepper flakes
2 tbsp salt
1 tbsp black pepper
6 cups water

In a large bowl, combine water, vinegar, sugar, thyme, pepper flakes, salt, and pepper, and stir until sugar and salt dissolve. Submerge pork chops in brine, cover with plastic wrap, and refrigerate for as long as possible.

CHOPS:
2-4 center cut pork loin chops, about 1 1/2 inches thick
1 tbsp olive oil
2 tbsp unsalted butter
1/4 cup minced shallot
2 tbsp balsamic vinegar
1 cup chicken stock
1 tbsp minced fresh sage

Preheat the oven to 200 degrees. Remove the chops from brine and pat dry.

Place a large frying pan (big enough to hold all the chops in a single layer) over medium-high heat until hot, then add olive oil and swirl to coat the bottom of the pan. When the oil is hot, add the chops and reduce heat to medium. Cook until the bottoms are browned, about 10 minutes. Flip and cook until the chops are no longer pink at the bone, about 10 more minutes. Put the chops on a heatproof platter, and keep in the oven to warm.

Pour off any pan fat and return to medium-low heat. Add 1 tbsp of the butter. Once the butter melts, add the shallot and cook, stirring until it has softened. Add the vinegar and bring to a boil; boil until it has reduced by about half. Add chicken stock and sage, raise the heat to high, boil, scrape up any browned bits in the pan, and reduce until it's about a 1/3 cup of liquid. Remove from the heat and add the rest of the butter; swirl it in, but don't stir it.

Return the pan to low heat, add the chops back to the pan, and cook for a couple minutes, turning the chops in the sauce. Spoon the extra sauce over the chops to serve. (Good with rice and sauteed greens.)

Saturday, November 3, 2012

Hearty Breakfast Skillet

Oh man, this was the best breakfast EVER. Says the husband as I type this, "This was the best skillet I've ever had." I mean, you can't beat that kind of feedback, right? It was a blast, because we made it together - Joef taking charge of the bacon and veggie-chopping, me watching the potatoes, eggs, and putting it all together.

We both agreed that, considering all the different elements involved, it wasn't too much mess, either; and certainly, not difficult, especially with a cup of coffee in hand. I almost always order a skillet if it's on the menu - so why not make 'em at home?

Here's all you need (this would serve four if you added two more eggs - we had copious leftovers):
1 lb (or so) potatoes, cubed - we used these tiny little round guys, about the size of a bird egg, that came in a mix of purple, Yukon gold, and red! 
Butter
1/2 white onion
4-5 Thai green chiles
2-3 smallish bell peppers - we had purple, green, and yellow heirlooms, which were awesome - but you could substitute bells 
Rosemary, pepper, and salt for seasoning
1/2 lb bacon
1/2 large (green heirloom) tomato
Sharp cheddar cheese (Wisconsin, of course), shredded
2 eggs, over easy

Start by boiling the potatoes until they've softened, but still retain some firmness. In the meantime, you can chop the veggies and cook the bacon (here's where it's nice to have a helper!). When your ingredients are prepped, generously grease a large pan with some butter, and add the onions and chiles. Cook them on medium-high heat until the onions start to soften, adding a couple spoonfuls of bacon grease (oh yeah) from the bacon that's cooking. Add your peppers and let them saute and soften a bit as well. Add a few torn rosemary leaves, and season with salt and pepper to taste. Stir from time to time. Stir in the potatoes. A couple more spoonfuls of bacon grease sure doesn't hurt.

Cook until the potatoes and onions start to brown a little. Add in the bacon. Add the tomato at the very end. Remove from heat, then top with cheddar and a fried egg over-easy. Enjoy the glory of a full-on food coma!

Saturday, October 27, 2012

Homemade Jam

Joef and I recently discovered the joys of making homemade jam. On a whim one night, we went to the local grocery store. I asked the first staff person there where I could find the jamming jars. We found them, and then she hovered around. "What kind of jam are you making?" "Oh, I donno...we were thinking peach?" "Oh." "....Do you, um, have any suggestions?" Did she ever! About twenty minutes later, she had sent us off with recipe ideas, guidance on how to seal and purify the jars, instructions on how to make jam without pectin, proportions...pretty much everything you ever wanted to know about jamming. Including the fact that it's called "jamming", and those who jam regularly are called, as she referred to herself, "jammers".

Well, we've made three jams so far, so we're getting there! They are so delicious and fresh. And it's really not that hard. Especially when Joef does most of the work. We're still experimenting a bit with consistency, probably the toughest thing to master - we've had two that are a little runnier than ideal, and one that's a little chunky, but all three have legitimately been jam. We eat it on toast, waffles, even as ice cream topping.

The three we've made to-date have been: Strawberry-Rhubarb Bourbon, Blackberry-Raspberry Petite Syrah, and Mango. The instructions are essentially the same each time:

7 lbs of your fruit of choice (we pared and halved the strawberries, and cubed and mashed the mangoes)
7 cups of sugar
2 cups booze of your choice (or, in the case of the mango, none at all)
Juice of 1-3 lemons, depending on the sweetness of the fruit and your personal taste
12 jars

Preheat the oven to 260, and wash your jars. Put the jars and the part of the lids without the rubber into the oven for the duration of the cooking.

Combine all of the ingredients into a massive pot. The liquid will obviously boil down faster if you use a wider pot with more space for evaporation. Stir and cook on very high heat until it reaches a rolling boil, then turn down the heat slightly, while still keeping it at a rolling boil, and stir constantly until it thickens and starts to appear somewhat oily and shimmery on the surface (at least 30 minutes). To test its readiness, put a small drop on a spoon and place it in the freezer for three minutes, while continuing to cook the jam. If it's the consistency you'd want your final product to be when it comes out of the freezer, it's done. Otherwise, keep on cooking and freezer-testing as needed.

When your jam is done, take the jars out of the oven, but keep the oven on. Spoon the jam into the jars, and tighten the lids. Place back into oven for twenty minutes.

Your jam is ready when the lids pop and you can't push them down again (it means they're sealed). Once you've opened a jar, store it in the fridge. Enjoy!

Wednesday, October 10, 2012

Linguine with Raw Tomato Sauce

(from Mark Bittman's How to Cook Everything)

This is a great spin on everyday tomato sauce. It's great for our new Berkeley surroundings, where we have access to super-fresh produce - in this case, particularly Berkeley Bowl heirloom tomatoes and fresh basil from the garden (although I already killed the first basil plant and am on my second; a green thumb, I don't have!). 

This basically has all the usual components of tomato-basil sauce - tomatoes, garlic, basil - you just don't cook any of it. The garlic becomes more potent, and it's wonderfully fresh and light. The pasta warms the sauce up. It reminds us of the sauce at D'Amico and Sons in Minnesota, a favorite of Joef's when he was growing up.

So, it's quick, fresh, yummy:
2 cups roughly chopped fresh tomatoes
2 tbsp olive oil
Freshly ground black pepper
Salt to taste
2 cloves garlic, lightly smashed and then chopped
1/4 - 1/2 cup fresh basil leaves, chopped
1 lb pasta
Parmesan cheese for serving

Start your water boiling and salt it. In a large bowl (with a broad, flat bottom, and ideally enough room to hold all the pasta), combine and mash the tomatoes, oil, salt/pepper, garlic, and half the basil. (I use a large, wooden muddler) Don't mash it so much that it becomes a puree - just break it down and combine the flavors a little. The sauce can sit for up to two hours like this (or you can use it right away).

After the pasta is cooked, ladle a little pasta water into the sauce to warm it up and thin it out a little. Bittman removes the garlic at this point (he just smashes it, doesn't chop it) - I think I left it in. Toss the pasta in the sauce, adjust the seasoning as needed, top with the rest of the basil, and serve with parmesan cheese.

Wednesday, September 19, 2012

Chicken with Tarragon and White Wine


(from Giada de Laurentis)

I'm between jobs right now, so I've been spending a lot of time (sigh) watching all kinds of bad daytime TV. This includes cooking shows (let's face it, though, it's usually Say Yes to the Dress and Property Brothers), which is where I found this recipe. I watched Giada make it, then gave it a stab myself. Her type of cooking is the type I can recognize and replicate without too much instruction (garlic? Got it!), so I was actually pretty happy with how it turned out, sans recipe.

That being said, I made this over a month ago, and promptly forgot how to make it. Luckily for me, the Internet is a great refresher, and I found the exact recipe (without God-knows-what modifications I made), which you can find below, with some modifications.

This was really easy and delicious, and it's nice because it seems fancy and could therefore be served to guests. Of course, Giada made some kind of appetizer and these little miniature fruit tarts...for lunch. Not going to happen, folks. So I made it for dinner, with some roasted Brussels sprouts, and called it good. And it was!

So:

1/4 cup vegetable oil (I used olive oil. I mean, come on...)
1 (4 1/2-pound) chicken, cut into 8 pieces (I used four chicken thighs)
Kosher salt and freshly ground black pepper
Flour for dusting
1 1/2 cups (about 10 ounces) cipollini onions, trimmed and peeled (grab a handful)
4 cloves garlic, halved
Kosher salt and freshly ground black pepper
1 cup white wine, such as Riesling
3 cups low-sodium chicken broth, plus 1/3 cup
1/2 cup chopped fresh tarragon leaves, plus 2 tablespoons
Heat the oil over high in a Dutch oven or large saucepan. Season the chicken with salt and pepper, dust with flour, and cook, turning occasionally to brown on all sides.

Scoot the chicken to the side and add the onions and garlic, seasoning with salt and pepper to taste, about five minutes. Increase the heat and add the wine, scraping up the brown bits that cling to the pan. Add 3 cups of the chicken broth and 1/2 cup of tarragon, and bring to a boil. Reduce the heat to low to simmer, and cover. Turn the chicken every 10 minutes or so until it's cooked through. Serve over brown rice and garnish with remaining tarragon.

Now, what the Internet version says to do is a little different, and not what I remember following from TV. It sounds good, though, so if you wanted. You'll need:
2 tablespoons all-purpose flour
2 tablespoons unsalted butter

Remove the chicken to a platter. In a small bowl, mix the remaining 1/3 cup chicken broth and flour. Whisk the flour mixture into the sauce in the pan until smooth. Bring the sauce to a simmer and cook uncovered until it thickens. Stir in the butter, and serve the sauce over the chicken.

Wednesday, September 12, 2012

Moqueca - Brazilian Fish Stew

(adapted from Saveur magazine)

While we're on the topic of shrimp (when are we not?!), here's a great and pretty easy recipe for a hearty stew that uses them, discovered in a recent issue of Saveur magazine.

The recipe was a good one, although we both agreed that we expected more flavor from the final result. So I've modified the original recipe to include some additional things (my untested additions are starred below, so you can make it as-is, or give the alternative a shot and lemme know how it goes), like cayenne and extra garlic. Maybe it's because we couldn't find palm oil and had to substitute butter. In any case, it was still pretty delicious, and a nice alternative.

1.5 lb boneless, skinless catfish filets, cut into 2" pieces
8 oz shrimp, peeled and deveined
Juice from two limes
*12 cloves garlic (recipe called for 8)
Salt and pepper to taste
3 tbsp olive oil
1 medium/large yellow onion, 3/4 minced, 1/4 thinly sliced
1 "Italian frying pepper" (if you have any idea what an Italian frying pepper is, use it; I used a jalapeno); 1/2 minced, 1/2 thinly sliced
*Cayenne pepper to taste
2 plum tomatoes, 1 minced, 1 thinly sliced
*1 cup chicken stock (recipe called for fish or vegetable)
1 cup coconut milk
2 tbsp palm oil (recommended if you can find it; I used butter)
1/4 cup minced cilantro
1/2 cup minced Thai basil leaves
Cooked brown rice, to serve

Toss the fish, shrimp, lime juice, half the garlic, and the salt and pepper in a bowl and set aside. Heat the olive oil in a Dutch oven over medium-high heat. Add the rest of the garlic, the minced onion, and the minced pepper, sprinkle with cayenne, and cook until soft. Add the minced tomatoes, and cook until broken down. Add the stock, coconut milk, and palm oil/butter, and bring to a boil. Drain the fish and add to the pot, cooking until just cooked through, about 7 minutes. Add the sliced onion, pepper, and tomato, and cook, covered, for about five more minutes. Stir in the cilantro and basil, season with salt and pepper. Serve over rice.

Thursday, August 30, 2012

The Best Shrimp Recipe Ever

 
Are you ready for this? The best shrimp recipe ever? Yes, you are. Because it is so delicious, and so easy, it will become your new go-to, and you'll make it again. At least I do.

100% credit - maybe 110%, it's that good - goes to my dad for this one (and, admittedly, for many others!). He made it for us when we were home over the summer, and oh my God. I mean, I love shrimp already, but even people (ahem, Joef) who don't go insane for shrimp (really, though? How could you not?) love this recipe.

I made it for the first time on one of the first nights in our new place, accompanied by some truly amazing steak from The Local Butcher Shop (yet another reason to love Berkeley, by the way). Unfortunately, I lost/deleted pictures of that steak (gah!). Fortunately, we made the shrimp again (as if we wouldn't!), so at least we have that going.

The secret is my dad's marinade, and cooking them up nice and quick over the grill. Oh, and leaving the skin on. You can turn it into a big meal (serve with steak and fresh salad for some surf-and-turf), medium (maybe some nice aglio e olio), or relatively light, just the shrimp and, say, a nice arugula salad with fresh cherry tomatoes, baby mozzarella, and a cherry balsamic vinaigrette. Drooling...
           

This might be one of my favorite recipes, period. I mean, I don't want to artificially raise hopes and all that, but I'm pretty confident it won't fail you.

Because it's a marinade, the recipe is rather loose. Here's what my dad said:

Olive oil, garlic, ginger, black pepper, parsley, lemon juice.

You can kind of play with the amounts of the ingredients, and my general guidance would be:

1-2 lbs shrimp, cleaned and deveined, but NOT peeled
Juice from two lemons, and some pulp (take the end of a spoon or tongs and just jam it into the lemon while squeezing)
2-4 cloves garlic, smashed a bit with the side of a knife, then roughly chopped
2-4 twists of the black pepper mill
Small bunch of parsley, chopped
Generous amount of ginger powder (yes, powder) - 5 or so shakes?
A few glugs of olive oil 
Bamboo skewers, soaked in water beforehand

You should have enough liquid to coat the shrimp, and some will pool in the bottom of the bowl as well. You combine all of these ingredients in a bowl, stir them up to coat the shrimp, then pop them in the fridge for about 3 hours. Skewer them, making sure the skewer pierces the shrimp in two places, and that all tails are facing the same direction.

Shrimp cook really fast, so just cook them a couple/few minutes on each side on the grill, so that they get nice and pink. Eat outside with a nice white wine, and it will be a wonderful evening.

Tuesday, August 28, 2012

Soft-Boiled Egg Sandwiches

This is one of the first breakfasts we made in our new place. We had fresh heirloom tomatoes (those yellow bits) from the Farmers Market, Joef hadn't started work yet, and this was just the perfect lazy morning meal.

There's a place in Boston called Clover Food Lab where we first had breakfast sandwiches like these, with pita and soft-boiled eggs. I don't know what they did to those things, but they were crazy delicious. And these were, too.
 
I had to learn how to make a soft-boiled egg. Thanks, Internet!: http://www.wikihow.com/Make-a-Soft-Boiled-Egg. If you feel like yours end up too runny after following these instructions, you can pop them in the microwave for like, 10-20 seconds.

All you need is:
Eggs, poached (see link above)
Pita bread
Cheddar cheese, sliced
Tomato, sliced

Assemble! I'd recommend putting everything together, apart from the egg, first. Then you can pop the warm egg right in there and start melting the cheese a bit. Mmmm!

Friday, August 17, 2012

Chobani Black Cherry Brownies

(from Chobani)

Time for a Joef recipe, folks (generally, when there's dessert involved, or baking, it's all Joef; he is simply way better at this whole following a precise recipe thing than I am)! On one of our first trips to the grocery store in Berkeley (oh yeah, we moved! It's awesome here!!), we were picking out yogurt, and Joef spotted a recipe for brownies on the back of a Chobani yogurt container. I generally don't get that enthused about desserts, so I reluctantly said yes, let's do it, but you're doing all the baking! Joef happily took up the mantle.

And OhMyGod, am I glad he did. I can't tell you how delicious these are! I mean, I can - they are SO delicious! Moist, flavorful...just, wow. I've heard some of my baking friends talk about using yogurt in their cooking, and now I get it. The fact that it's Greek yogurt adds just that hint of tartness that keeps it from being too, too sweet. Oh man. I want these again.

Here's the recipe, straight off the container:
1 cup black cherry Chobani non-fat Greek yogurt
1 cup sugar
2 large eggs
1 tsp vanilla extract
1/2 cup unsalted butter
1 10oz bag semisweet chocolate chips
3/4 cup all-purpose flour
1/2 tsp salt

Whisk the Chobani, sugar, eggs, and vanilla together in a bowl. Melt the chocolate chips with the butter and let it cool, then whisk it into the Chobani mixture. Last, stir in the flour and salt. Grease an 8-inch baking dish and pour in the brownie mix. Bake at 350 for 35-40 minutes.

Enjoy!

Monday, August 13, 2012

La Piccina Cucina: Camping Edition #2

Every two years or so, Joef and I grab a few innocent and unsuspecting souls and drag them out to the Boundary Waters between Minnesota and Canada. This summer was my third trip and Joef's fifth, and it did not disappoint. It's some of the most beautiful, pristine wilderness I've ever seen, and I'll go back again and again. I mean, what's not to love about canoeing 20 miles a day with portages in between?

Last trip out, I posted about our handpicked blueberry compote. We were a little too early in the season this year for berries, but we did make a point of getting creative with cooking this time around. 

There was the usual fresh-caught fish (bass), fried:

But we also got experimental, with things like modified hummus (chickpeas, garlic, olive oil, sesame seeds, lemon, salt, and zatar are all easy to pack): 
Enjoy them with tortilla chips (cut tortillas into triangles and fry them up):
And we even made pasta, with pesto (paste) and sundried tomatoes:
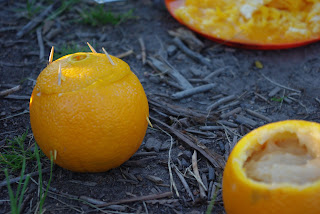
The coup de grâce was cake baked in an orange peel. Now, it should be noted that the final outcome, taste-wise, could probably, er, be improved upon. But the concept is sound! Next time, we'd only fill the oranges halfway, and would either put them on top of the grill, or further from the fire. There was a bit of an ashtray effect. But we MADE CAKE IN THE WILDERNESS! With sparkly frosting!
Choose a batter that doesn't require eggs. Slice just the top off an orange, and scoop out the insides. Mix your batter, and spoon it into the orange.
Secure the top of the orange with toothpicks.
Place the batter-filled orange(s) near the fire. Rotate now and then to heat all sides. Cook for...um...20 minutes? Eyeball it.
Remove the oranges from the fire. Allow to cool, then remove the tops.
Spoon out the cake and dab with frosting!

It was an amazing trip with amazing people. Plus, no injuries! Here we are, just after getting off the water:


Wednesday, August 8, 2012

Bake Sale Betty's Fried Chicken Sandwiches with Jalapeno Slaw, and, Welcome to California!

(adapted from www.food.com

Phew, talk about a hiatus! We're back, folks! To remind myself how long it's been since I've posted, and therefore, how long it's been since I've cooked anything (new, at least, but pretty much just anything), this recipe is from MAY. Specifically, from Joef's graduation from the Yale School of Management (watch me burst with pride!). Since then, we've moved out of New Haven, CT, driven to Pittsburgh, Chicago, Madison, and Minneapolis; camped in the Boundary Waters; driven back to Chicago and St. Louis; flown to San Francisco; driven back to Minneapolis, back to St. Louis; and then driven all the way from St. Louis to Berkeley, CA, where we now reside (hooray!).

This first-recipe-back is appropriate, then - Joef requested it for his graduation because he'd gotten to know and love Bakesale Betty's, an Oakland favorite, during his internship last summer. And now, internship has turned into full-time position, and here we are, living in the East Bay. And I'm finally posting this recipe. It's like a welcome to the neighborhood. And WOW, is it beautiful here. The local grocery store has more (low-price!) fruits and vegetables than I could count, about half of which I've never even heard of before. But I digress...

What really makes these sandwiches (besides the delicious, delicious grease!) is the jalapeno coleslaw. That's right. It's wonderfully tangy and hot, and cuts the grease of the fried chicken just right. I borrowed the recipe from Food.com, and it was a crowd pleaser.

By the way, this makes a TON of coleslaw. Way more than you need. So you could halve that portion of the recipe, if you so chose.

CHICKEN
4 boneless skinless chicken breasts (or however many sandwiches you want to serve - my memory is failing me, but I may have fileted the breasts in half, but that's up to you)
Salt
1 quart buttermilk

VINAIGRETTE
1 tbsp Dijon mustard
3 tbsp red wine vinegar
1 tsp kosher salt
 1/2 cup extra virgin olive oil

SLAW
1 small red onion, very thinly sliced
1 cup red wine vinegar
2-4 jalapenos, seeded, cut in half and sliced crosswise
1/4 cup parsley, chopped
1/2 green cabbage, core and outer leaves removed, and very thinly sliced
Salt

BREADING
1 lb all-purpose flour
1 tablespoon cayenne pepper
1 tablespoon salt (or more to taste)
1 1/2 teaspoons fresh ground pepper

AND
2 quarts vegetable oil for frying
4 rolls (or however many sandwiches you want to make)
Season chicken breasts with salt. Let sit at least 5 minutes. Fill a wide, shallow nonreactive bowl or casserole dish with buttermilk. Add the chicken and soak in the refrigerator for 1 hour. 
In the meantime, start on the vinaigrette: combine mustard, vinegar and salt in a bowl. Slowly whisk in olive oil until well blended.
Then, start on the slaw. Macerate onions in the cup of red wine vinegar, and let sit at least 20 minutes. (I had to look up what "macerate" means. It's the process of softening something by soaking it in liquid.) Remove onions and discard vinegar. Toss onions with jalapeno, parsley, cabbage and salt. Toss with vinaigrette until evenly coated. 
Ready to fry the chicken? Prep the breading by mixing flour, cayenne, salt and pepper in a wide, shallow bowl. Pour vegetable oil into a large stockpot. Do not fill up more than halfway, or the oil could splatter. Bring oil up to 365°, using a digital thermometer/candy thermometer to monitor the heat. Pull a chicken breast out of the buttermilk one at a time, letting excess drip off, and dredge completely in flour. Do not drain or shake off excess buttermilk or flour during the breading process. That's the yummy part!
When the oil is at 365°, carefully place chicken pieces into oil one by one. Let each cook for a minute before moving the piece, then help it “swim” in the oil with tongs, until it is evenly cooked, about 5-7 minutes. Remove chicken from oil and drain on paper towels. Season immediately with salt.
To pull it all together, place fried chicken breast on bottom of torpedo roll and top generously with coleslaw. DEVOUR!

Sunday, May 27, 2012

"Greek" Pasta Salad

Last week, Joef graduated from the Yale School of Management. I'm wildly proud of him, and feel very lucky to have been able to spend two years with such a fascinating and fantastic group of people. Joef's parents, sister, and our youngest nephew came into town to celebrate with us, and we knew where we wanted to take them: The Place in Guilford. I've actually only been there once, last summer, and I've been wanting to take Joef since then. It's an all-outdoor restaurant with a giant firepit in the middle of bunches of tables with tree stumps for chairs. They serve grilled clams, lobster, salmon, chicken, shrimp, corn-on-the-cob, and delicious desserts. Shattered clam shells serve as flooring, and it's just great.

It's also a BYO type of place, from beverages to sides to, well, pretty much whatever you want. I decided to put together a quick pasta salad, something I'd seen Rachel Ray throw together on TV a few years back. It's simple and delicious, and great as leftovers the next day. It complemented our grilled salmon in aluminum foil and clams with butter just right. It's an "eyeball it" type of recipe, so here's approximately what you need:

3/4-1lb orzo pasta, cooked
1 package grape/cherry tomatoes
1 cucumber, diced
1/2 red onion, diced
Kalamata olives, however many you want
Feta cheese sprinkles, sprinkled generously
Olive oil
Balsamic vinegar

You guessed it: just prep the ingredients and mix them all together, using a 2:1 or ratio on the olive oil: vinegar. Picnic time!


Cooking Lesson!


 This year's Piccina cooking lesson bid went to Megan Richer! Megan, like Greg before her, chose risotto (this time, with parmesan and arugula), with a side of Brussels sprouts (which Jason prepared expertly), also with parmesan. Joef taught hot fudge, one with naga jolokia, and one without. There's nothing better than cooking (and even more so, eating) with friends, and we had a fantastic time with everyone!


Wednesday, April 11, 2012

Risotto con Pancetta, Vino Rosso, e Radicchio

from Loukie Werle's Italian Country Cooking

Have I told you how much I love this cookbook? Oh, really? Only about 100 times, you say? Well, I'm saying it again. I love this cookbook. The recipes are what I think of when I think of Italian food, the ingredient list is short and simple, the dishes are unique, and every recipe turns out great.

That being said, I actually tried this recipe a few weeks back, and failed. That's not the recipe's fault, though. I bought some black rice at Eataly while we were in New York, and even though it was called "risotto", it was clearly not the right kind. Oh my Lord. It just would not cook. I mean, I seriously cooked it for like four hours, and it was still crunchy and undone.

So maybe it's a testament to how good this recipe really is, that we still saw promise in it, and decided to give it another shot, this time with good ole fashioned Arborio. Lo and behold, a wonderful dish. What's fun about it is that it's the usual risotto recipe and flavor, but everything is, I don't know...darker and heartier. Instead of white onion, you use red. Instead of white wine, red. Radicchio, pancetta...just a lot of red, I guess. I loved it.

1.5 tbsp olive oil
1/3 lb pancetta, cut into pea-sized cubes
1 red onion, chopped
2 cloves garlic, finely chopped
2 cups risotto rice (Arborio, for example)
2 cups dry red wine
1 large radicchio, quartered and thinly sliced into ribbons
4-5 cups chicken broth (beef would work, too), simmering
1/3 cup freshly grated parmesan cheese
Hot pepper, optional (we added a pinch of Naga Jolokia flakes with the pancetta, but that's just us)

Combine the oil and pancetta in a large, heavy-based pan. Saute over medium heat until browning and slightly crisp, with the fat starting to run, about 8 minutes. Add the onion and cook until soft, about another five minutes or so. Add the garlic and stir a minute more.

Add the rice and stir a few minutes to coat. Add the wine and stir until it's been absorbed, about 5-8 minutes. Add the radicchio and ladleful of the simmering stock, and stir until the stock has been absorbed. Continue adding stock in this manner until the rice is al dente, about 20 minutes. If the stock runs out before the rice is cooked, continue using simmering water.

When the rice is done, remove from heat and stir in the parmesan. Let it stand, covered, for three minutes before serving. Soooooo good.

Thursday, March 29, 2012

Collard Greens, Two Ways

Above: Smoky Collard Greens, from Claire Robinson's Five Ingredient Fix. Below: Sauteed Collard Greens with Prosciutto, a la Piccina Cucina
 

We apparently have a penchant for bitter greens in this house. Actually, I think we probably just have a penchant for anything we can smother in olive oil, but hey, let's take the healthy excuse. Our latest discovery, adding to the broccoli rabe and brussels sprouts repertoire, is collard greens. So good! The first time I made them, I did them just like I do broccoli rabe, except I added a little (ahem) butter in with the olive oil. This time, I added a little prosciutto (just getting healthier and healthier). Served it with pork chops (mmm, pork with a side of pork!).

Another great way to make them, as I discovered in Five Ingredient Fix, is to sautee them with paprika, cayenne, and onions for a smoky flavor. I served those with aglio e olio.

Both ways are good (or all three ways, I suppose), and since it's a side dish, hey, try them all.

SMOKY COLLARD GREENS
3 tbsp olive oil
1 medium sweet yellow onion, sliced
1 tsp sweet smoked paprika
1/4 tsp cayenne pepper
Salt and ground pepper
2 1/2 lbs (about 2 large bunches) collard greens, stems chopped off, sliced into thick ribbons, and halved

Heat the olive oil in a Dutch oven or sautee pan over medium-high. Add the onion, paprika, and cayenne, and season with salt and pepper. Cook, stirring occasionally, until the onion has softened. Add 1/2 a cup of water to the pot (SIX ingredients!). When the water simmers, add the greens (pack them in, they'll wilt). Season with more salt and pepper if needed. Cover with a lid and cook for 10 minutes or so. Remove the lid, toss the greens, reduce the heat to medium-low, and continue to simmer until the greens are completely cooked and the liquid has all evaporated, about 10 more minutes. Serve warm.

SAUTEED COLLARD GREENS, WITH OR WITHOUT PROSCIUTTO
1-2 tbsp or so olive oil
3-4 cloves garlic, chopped
4-5 slices prosciutto, torn into smaller pieces (optional)
1/2 - 1 tbsp butter
1-2 large bunches collard greens, stems chopped off, sliced into thick ribbons, and halved
1 cup chicken broth

Prep your greens, then add olive oil and butter to a large sautee pan over medium heat. If using prosciutto, add to pan and cook until a little crisp. Add the garlic. Let the garlic cook a few minutes without getting brown, then add all your greens to the pan. Let them start to wilt, tossing to combine. Add chicken broth, and toss again. Continue to cook and rotate until the greens wilt and most of the water has boiled off. Takes longer than rabe, about 20 minutes. Serve warm.

Sunday, March 18, 2012

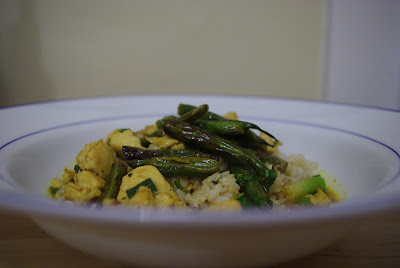
Thai Chicken Curry

(adapted from Williams-Sonoma's Food Made Fast: Weeknight)

This is a pretty neat cookbook. Joef got it for me a few years back for my birthday, and it's perfect for my style of cooking - fast, and not too many ingredients. If something takes more than 1/2 an hour to make, it had better be a special occasion, or something I can just leave on the stove for a couple hours while I go about my business.

Pasta is my favorite "fast" food (and favorite food in general, really...and pretty much my whole diet), but when it comes to weeknight cooking, I default to pasta, perhaps, too often. So I was excited to try this recipe, and it was really yummy, and fun to make.

The cookbook gave this a "30 Minutes Start to Finish" rating. I'm going to have to disagree. There was a lot of prep involved, which took about 20 minutes on its own, and then there was the actual cooking, another 20 minutes or so. Still, not bad for a meal that looks and tastes pretty fancy. I especially liked the crispiness of the green beans.

I'd make a few modifications next time (reflected in the instructions). It called for two limes. It was just too limey. And I couldn't find Thai red curry paste, so I used red curry powder, which was probably not an ideal substitute, although it worked. Finally, I got panicky at the end that it wouldn't be enough sauce, so I added the whole can of coconut milk (as opposed to 1 cup), and then doubled the broth, fish sauce, and curry paste. (Even with that doubling, it was still too limey.) Of course, then it was really brothy.

So, let's see if I can reproduce this:
1 lime
1 package (1-1.5 lbs) boneless, skinless chicken breasts or tenders
Salt and pepper
3 tbsp peanut oil (careful, the flash point on this stuff is intense - lots of bubbling and popping)
1/4 lb green beans, trimmed and cut into 2-inch pieces
1.5 tbsp Thai red curry paste (alt. if absolutely necessary, red curry powder)
1-2 cups unsweetened coconut milk
2/3 - 1 1/3 cups chicken broth
1-2 tbsp Asian fish sauce
6 green onions, including white and tender parts, sliced
1/4 cup fresh basil (Thai if you can get it, which I couldn't)
Steamed brown rice, for serving (1-2 cups)

Grate 1/4 - 1/2 tsp lime zest and squeeze 1/16 - 1/8 cup juice (like 1/2 a lime, maybe 1 whole lime, depending on what you want). Set aside. Cut the chicken into thin strips or cubes and season with salt and pepper. In a large frying pan or wok over medium-high heat, warm the oil. Add the chicken and cook, turning occasionally, until golden. Transfer to a plate with a slotted spoon. Add the green beans to the wok and cook, stirring frequently, until they start to get tender and a little golden/crispy. Transfer to the plate with the chicken.

Stir the curry paste into the pan over medium-high. Stir in the coconut milk, broth, and fish sauce. Bring to a simmer and stir, scraping up any browned bits on the pan. Stir in the lime juice and zest.

Add the chicken and green beans back to the pan and stir to coat with sauce. Simmer until the chicken is opaque throughout. Stir in the green onions and basil, then serve over rice.

Sunday, March 11, 2012

Shredded Brussels Sprouts with Parmesan


(inspired by Eataly)

Joef and I finally made it to Eataly last weekend. We've been wanting to go since it opened, and we finally got the chance on a weekend trip to NYC.

It was pretty impressive - just huge. The selection was staggering (and you pay for that selection). At the same time, while I really enjoyed myself there and am glad I went, I think ultimately I'm more impressed by the small, family-owned Italian groceries that we used to go to in Chicago and that exist all over New York. I feel like you can get just about whatever authentic ingredient you want there, too. That being said, it was definitely worth the visit.

We ate at the pasta restaurant (La Pasta, appropriately), and for the antipasto misto, one of the three items was a delicious shredded brussels sprouts dish with pecorino and olive oil. I decided it wouldn't be too difficult to recreate, and since I'm on a brussels sprouts kick, hey, why not?

I think I almost got it. Next time, I'd cut off more off of the ends of the sprouts, because I think they get a little more bitter. Also, I'm trying to figure out if they blanched the sprouts beforehand or not - mine were a little crunchier, more like a slaw. Still, they were really good - a nice side dish with steaks with herbed butter and some orzo.

1 package fresh brussels sprouts, sliced thin
Olive oil
Parmesan cheese
Salt and pepper
Lemon juice, fresh-squeezed, optional

When you prep the sprouts, make sure to peel off the outer leaves that may be browned or yellowed. Once you've sliced them, put them in a bowl, and add olive oil, parmesan, and salt and pepper to taste. I'm not sure about proportions (wow, what a great recipe!), but enough olive oil to coat, and parmesan to taste. Add a squeeze of two of lemon juice, stir, and serve!

Wednesday, March 7, 2012

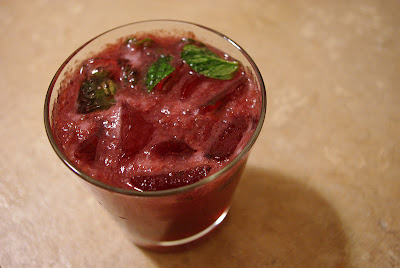
Blueberry Bounce and Blueberry Bounce Mojito


Two recipes in one today! You may recall our Raspberry Bounce experiment from www.cottagesmallholder.com. Well, we couldn't get enough of making our own liqueurs, so Joef (he's the drink master) adapted the recipe for blueberries. I liked this even better than the raspberry. The only differences in this recipe besides the fruit are that we mashed up the blueberries, used sugar in the raw instead of white sugar, and we didn't have to let it sit as long. All good things, I think. Plus, how beautiful is that color?! Plus, blueberry bounce mojitos!

BLUEBERRY BOUNCE
300g fresh blueberries
350g sugar in the raw
1.5 liters (or more) of medium quality vodka (don’t be tempted to go for the cheapest)
Sterilized 2-liter bottle

Wash blueberries. Mash blueberries. Place berries in the large bottle, squeezing the berries through the neck of the bottle.

Using a funnel, add the sugar and top up with vodka to 2-3cm from the top.

Shake it up a little, then leave it in a dark place, shaking every now and then, for about two weeks (shorter timeframe than its raspberry cousin).

What will you do with your blueberry bounce, you might ask. The answer is, make a million of these "mojitos", because they are delicious:

BLUEBERRY BOUNCE MOJITO
2.5 shots blueberry bounce
8-10 fresh mint leaves
juice from 1/2 small lemon
Tonic water
Dash bitters
Ice

Squeeze half a lemon into a tumbler glass. Add mint leaves. Muddle/bruise. Add blueberry bounce. Add ice. Top with tonic to fill glass, or to taste. Add a couple dashes bitters. Stir. Drink and enjoy!

Friday, February 24, 2012

Oven-Roasted Brussells Sprouts


Many years ago, when I was very young, I kept a diary. This was not a "so-and-so boy is SO cute!!!" type of diary. It was a "I am SO lucky that I love brussels sprouts!" type of diary. You see, I was extremely easy to influence at this age. My parents had made brussels sprouts for dinner, gotten me all whipped up into a frenzy by saying, "WOW, Julia, these are SO good!!! Don't you love them?! Gosh, you're lucky!!". Apparently, that's all it took to get me to accept my love of brussels sprouts as fact and espouse that love on paper for posterity.

As the years went on, brussels sprouts and I had sort of a falling out. It had really been years since I'd had them. That is, until Joef and I went to out to eat at Zinc for Valentine's Day, and ordered the grilled natural hangar steak in cabernet-bordelaise sauce with roasted baby brussels sprouts. Oh my Lord. The steak was fantastic. The sauce was fantastic. The brussels sprouts were out of this world. They absolutely stole the show.

So I had to give them a go at home. I browsed a few online recipes for oven-roasting brussels sprouts, and then just went for it. Now, I didn't have baby brussels sprouts, and I didn't have a cabernet-bordelaise sauce, but wow. These were still absolutely awesome. You can practically eat them like candy. Savory, slightly bitter, delicious candy. Combine that with the fact that they're insanely quick and easy, and you've got a new menu regular.

I think it's best not to be too exact with this recipe, so:
1 package brussels sprouts
Olive oil
Salt
Ground pepper
Balsamic vinegar or lemon juice, optional
Parmesan cheese, optional

Preheat the oven to 400. Prep the brussels sprouts by trimming the stem ends and then peeling off any yellow outer leaves. Next, cut them in half lengthwise and throw them in a bowl. Drizzle on some olive oil, add salt and pepper to taste, and if you want, add a splash or two of balsamic or a squeeze or so of lemon juice. Toss.

Pop the sprouts in the oven on a rimmed baking sheet and roast for about 30 minutes, or until they're crispy on the outsides (see photo). Stir them around once or twice while they're in the oven. When you take them out, you can sprinkle them with a little parmesan cheese before serving. So surprisingly good!

Tuesday, February 7, 2012

Peas, Mushrooms, and Prosciutto Sauce with Cream

(adapted from Marcella Hazan's Essentials of Classic Italian Cooking)

Hooray! Italian food! Pasta! Carbohydrates! Honestly, I love all kinds of food, but if I've gone too long without pasta, things get ugly. I just need it. It's my core diet.

I had never tried making a cream sauce before (well, I did a makeshift - but yummy - alfredo or two in college). I had a sense of what I wanted to do, and I read Marcella's recipe for "Peas, Peppers, and Prosciutto Sauce with Cream" to get a sense of the basics and then improvised. While I'm sure I didn't improve on Marcella (is such a thing possible?), this was really delicious. Great for a chilly winter evening, when you need a little fattening up.

This is fast, so you can start the water boiling while you prep the ingredients.

1/2 package mushrooms, sliced and maybe halved
2-3 tbsp butter
4-6 thin slices prosciutto, torn into strips
1 cup small frozen peas, thawed
1 cup light cream ("healthy"!)
Salt
Freshly-ground black pepper
Pinch ground nutmeg
1/2 - 3/4 cup grated parmesan cheese
3/4-1lb pasta

Start by sauteeing the mushrooms in the butter over medium heat with a little salt and ground pepper. When they've softened, add the prosciutto and cook for about a minute. Stir in the peas, cooking for another minute.

Add the cream, along with salt to taste an another grinding of pepper, plus your pinch of nutmeg. Cook, stirring constantly, until the cream thickens.

Toss the sauce with your pasta and add the parmesan and stir. Serve and devour!

Tuesday, January 31, 2012

Creamed Onion Gratin

from Saveur magazine

This summer, I started subscribing to Saveur magazine, and man, I just love getting that thing. Have I talked about this before? It's such a relaxing, fun treat for me. I haven't subscribed to a magazine in ages, partially because you can find just about all of the content online. (In fact, even though I originally found this recipe in the magazine, I used the identical recipe posted at www.saveur.com.) But there is something I just love about reading the magazine cover-to-cover. So there.

Anyway, doing just that helped me to know exactly what I wanted to make when our friends the Jacobs...Jacobses?...had a group of folks over pre-Christmas for a little holiday potluck. Saveur had a whole article on different types of onions (who knew?!), and associated recipes. Creamed onion gratin stood out as something not too hard, and also as something totally not in my wheelhouse. (Although, as it turns out, the sauce is basically a bechamel, so, you know, it at least has that in common with our family's lasagna!)

Ohhhhh man, this is soooo decadently, richly delicious. So wonderfully bad for you. The photo in no way does it justice - particularly since I took the photo before bringing it to the potluck, where I then quickly popped the dish under the broiler to make the cheese nice and golden and just a little crisp. A great side-dish, especially for the holidays. Great with a little bread.

SERVES 6–8
2 medium yellow onions, halved and quartered lengthwise
1/4 cup olive oil
Salt and freshly ground black pepper, to taste
2 tbsp unsalted butter
2 tbsp flour
1 cup heavy cream
1/4 cup dry white wine
Freshly grated nutmeg, to taste
1/2 cup finely grated parmesan
3 oz gorgonzola, crumbled
1/4 tsp paprika

Heat oven to 350. Toss onions with oil in a 9″x11″ baking dish and season with salt and pepper. Bake, stirring occasionally, until soft and lightly browned, about 1 hour, and then set aside. Heat oven to broil.

Heat butter in a small saucepan over medium-high heat; add flour, and cook, stirring, until smooth, about 1 minute. Add cream and wine, and cook, stirring, until thickened, about 5 minutes. Season sauce with salt, pepper, and nutmeg.

Pour sauce evenly over onions. Sprinkle with parmesan, dot with gorgonzola, and sprinkle with paprika. Broil until cheese is melted and golden brown on top, about 2 minutes.

Monday, January 16, 2012

Hotcakes (Naga Jolokia Chocolate Cupcakes)

(adapted...heavily...from Martha Stewart's Cupcakes)

Joef's passion for spicy food knows no boundaries. Entrees, mixed drinks, and now desserts. Well, I suppose we broke the dessert barrier with Naga Jolokia hot fudge. But now we've increased our repertoire to include cupcakes, Joef's own creation.

I had to persuade Joef not to bring these as a surprise to a dinner party - all participants were fully warned about the heat factor before indulging. Which is a good thing, because these are really, really spicy. They pack a punch. There is something about Naga Jolokia - a smokiness - that makes them go very well with chocolate. So, while Martha would undoubtedly not approve, they were really yummy, too. Plus, Joef is a way better baker than I am. It's in his blood. I just don't have the patience for the accuracy required.

One-Bowl Chocolate Cupcakes (makes 18)
1 1/2 cups all-purpose flour
3/4 cup unsweetened Dutch-process cocoa powder
1 1/2 cups sugar
1 1/2 tsp baking soda
3/4 tsp baking powder
3/4 tsp salt
2 tsp Naga Jolokia powder
2 large eggs
3/4 cup buttermilk
3 tbsp vegetable oil
1 tsp pure vanilla extract
3/4 cup warm water

Preheat your oven to 350, and line standard muffin tins with paper liners. With an electric mixer on medium, whisk together all the dry ingredients - flour, cocoa, sugar, baking soda, baking powder, salt, and Naga Jolokia. Do not breathe the mixture in - it'll burn. Reduce speed on your mixer to low, then add eggs, water, buttermilk, oil, extract, and water. Beat until smooth and combined, scraping down sides of bowl as needed.

Divide the batter evenly among the lined cups, filling each about 2/3 full. Bake, rotating tins halfway through cooking time, about 20 minutes (or until a piece of spaghetti inserted into the centers comes out clean). Transfer to wire racks to cool for about 10 minutes, then remove cupcakes from the tins and let them cook completely before topping with frosting (see below).

Fluffy Vanilla Frosting (makes about 4 cups, way more than you need)
3 sticks unsalted butter, room temperature
4 cups confectioners sugar, sifted
1/2 tsp pure vanilla extract

With an electric mixer, beat butter on medium-high until pale and creamy, about 2 minutes. Reduce speed to medium, and add sugar, 1/2 cup at a time, beating well after each addition and scraping down the sides. After every two additions, raise the speed to high and beat 10 seconds to aerate the frosting, then return to medium. This process should take about 5 minutes, and the frosting should be very light and fluffy.

Add the vanilla and beat until frosting is smooth. Bring to room temp before using, then beat on low speed until smooth again for about 5 minutes.

Sunday, January 15, 2012

Wounded Warrior Project

This April, Joef and I are participating in our second year of Tough Mudder, this time with Joef's dad! Tough Mudder is a 10-12 mile extreme obstacle course designed by British Special Forces, and it's amazingly intense and amazingly fun.

One of the best things about Tough Mudder (besides the mud) is that it raises money for the Wounded Warrior Project. The Wounded Warrior Project has three goals:
  • To raise awareness and enlist the public's aid for the needs of injured service members.
  • To help injured service members aid and assist each other.
  • To provide unique, direct programs and services to meet the needs of injured service members.
This year, I've pledged to help raise money for the Project, and I appreciate any support you're able to give. You can pledge online directly at: http://www.raceit.com/fundraising/donate.aspx?event=6863&fundraiser=r1849385. All donations are tax-deductible. Funds raised help support thousands of warriors returning from the battlefield by providing combat stress recovery programs, adaptive sports, benefits counseling, education and employment services, and other programs.

THANK YOU
in advance for your support!

For more on the Wounded Warrior Project: http://toughmudder.com/wounded-warrior-project/
Fore more on Tough Mudder: http://toughmudder.com/

View my fundraising page at: https://www.raceit.com/fundraising/fundraise.aspx?event=6863&fundraiser=4285

Tuesday, January 10, 2012

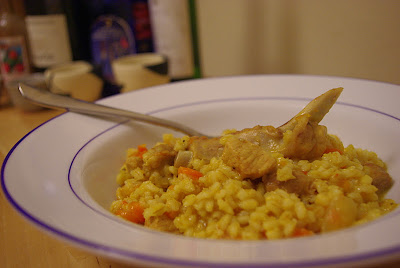
Pork Chop and Barley Stew

Well, we're back from two weeks in India! What a phenomenal trip. Definitely inspired to dive back into my Indian cookbook and try that more in earnest.

In the meantime, I have about five recipes waiting to be posted, so I need to get cracking. I don't even remember when I made this one, but it was great! Fantastic for winter. I never cook with barley, and was somehow under the impression that I don't like it, which is most definitely not the case. And I love cooking with a bone-in meat - the flavors are just that much better. One thing I did learn about barley is that it's very absorbent - so this was pretty thick. You could put less barley in if you wanted a soupier consistency, but I feel like the creaminess makes it more of a comfort food.

2 bone-in pork chops, diced (leave some meat on the bones
Salt
Pepper
Hungarian paprika
Olive oil
3 cloves garlic, minced
2 small onions
1 stalk celery, sliced thin
10 baby carrots, sliced thin
2 plum tomatoes, diced
8 cups chicken broth
Turmeric
1 cup barley
Olive oil

Start with a large, heavy pot. Brown the pork chops, including the bones, on both sides in a little olive oil and garlic over medium-high heat, sprinkling with salt, pepper, and a little paprika. Add the onions, celery, and carrots (you can add a bit more olive oil if it's dry), and stir occasionally until they start to soften. Add the chicken broth, barley, and tomatoes, and add a pinch of turmeric and paprika. Bring to a boil, then reduce heat to low. Simmer until the barley is cooked, about 1 hour.